Kit Upload
This page contains:
Kits allow you to configure your instance with a single upload. Kits can do the following:
Create projects
Upload methodology templates
Add Note templates
Upload report templates (Excel, Word, HTML etc)
Configure report template properties
Configure the Plugin Manager
Create Rules in the Rules Engine
Creating a kit
The kit is simply a .zip file that contains the specific files that you need to upload. The kit must follow a specific structure.
If you run into the following error when you upload a kit that you created, don't worry! There is help.
[13:54:00] An error ocurred: No such file or directory @ rb_file_s_stat - /tmp/d20200804-10496-11ca0p0/kit/templates/methodologies/.
You're going to need to zip your kit via the command line. To zip via the command line, first navigate to the folder where the kit folder lives, then run:
$ zip -ur kit.zip kit
If you're on a Mac and want to skip all the hidden files:
$ zip kit.zip -x \*.DS_Store -x \__MACOSX -r kit
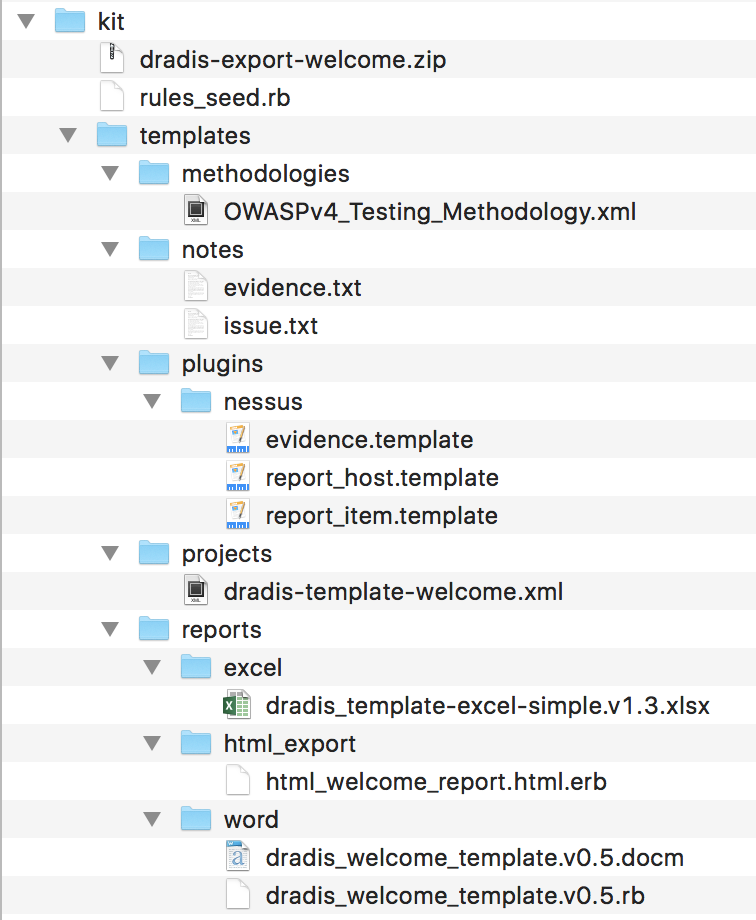
When you unzip a kit.zip file, you will see the following:
- A project package file (e.g.
dradis-export.zip) - A
rules_seed.rbfile that creates Rules in the Rules Engine. - A
/templatessubfolder
Seeding the Rules Engine
The rules_seed.rb file creates new Rules in the Rules Engine:
# ================================================================ Rules Engine
project = Project.last
tag_critical = project.tags.find_by(name: '!9467bd_critical').try(:name)
tag_high = project.tags.find_by(name: '!d62728_high').try(:name)
tag_medium = project.tags.find_by(name: '!ff7f0e_medium').try(:name)
tag_low = project.tags.find_by(name: '!6baed6_low').try(:name)
tag_info = project.tags.find_by(name: '!2ca02c_info').try(:name)
if Dradis::Pro::Rules::Rules::AndRule.where(name: 'Nessus N/A CVSS to 0.0').empty?
nessus1 = Dradis::Pro::Rules::Rules::AndRule.create!(name: 'Nessus N/A CVSS to 0.0')
Dradis::Pro::Rules::Conditions::FieldCondition.create!(rule: nessus1, properties: { plugin: :nessus, field: 'CVSSv3.BaseScore', operator: '==', value: 'n/a' })
Dradis::Pro::Rules::Actions::ChangeValueAction.create!(rule: nessus1, properties: { field: 'CVSSv3.BaseScore', new_value: '0.0' })
end
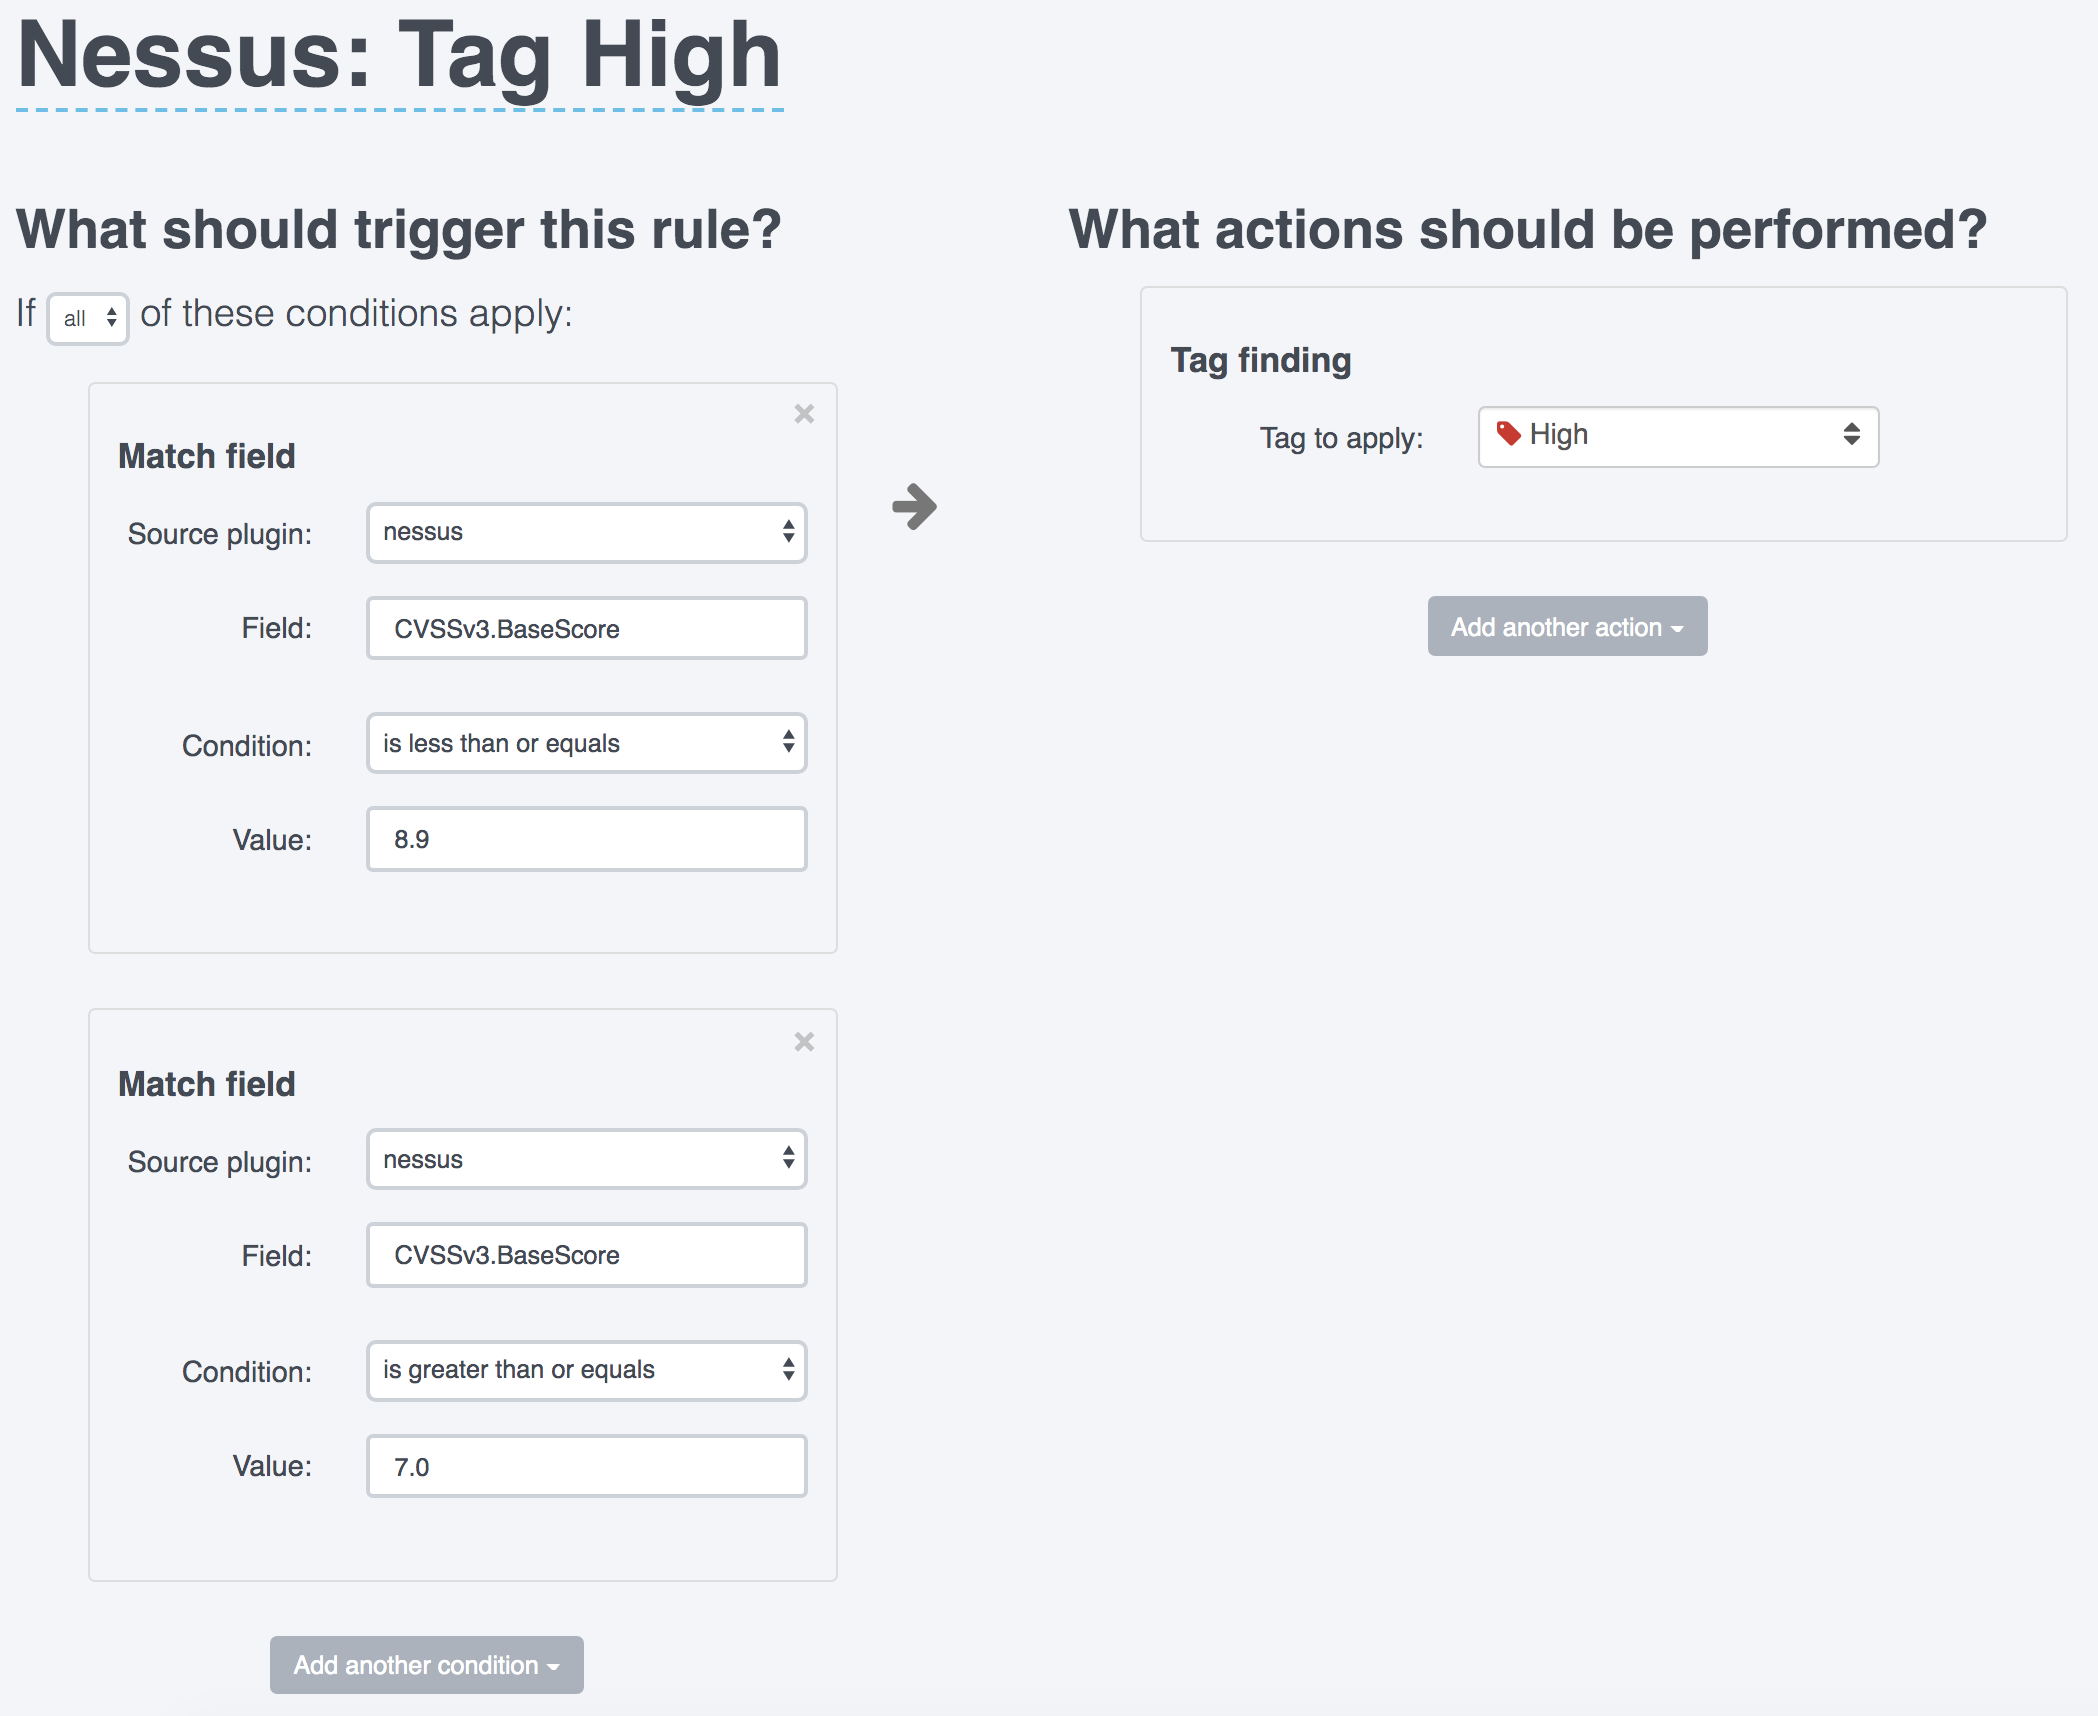
if Dradis::Pro::Rules::Rules::AndRule.where(name: 'Nessus: Tag High').empty?
nessus3 = Dradis::Pro::Rules::Rules::AndRule.create!(name: 'Nessus: Tag High')
Dradis::Pro::Rules::Conditions::FieldCondition.create!(rule: nessus3, properties: { plugin: :nessus, field: 'CVSSv3.BaseScore', operator: '<=', value: '8.9' })
Dradis::Pro::Rules::Conditions::FieldCondition.create!(rule: nessus3, properties: { plugin: :nessus, field: 'CVSSv3.BaseScore', operator: '>=', value: '7.0' })
Dradis::Pro::Rules::Actions::TagAction.create!(rule: nessus3, properties: { tag_name: tag_high })
end
First, the tags are defined, then individual rules are created. The Rule Title is set with name: (e.g. "Nessus: Tag High").
Then, the Triggers are created with Conditions. If you want to use Match All, use Conditions::MatchAllCondition, and if you want to Match Field, use Conditions::FieldCondition.
To match properly on the field, you'll want to define the plugin, field, operator, and value.
| plugin | field | operator | value |
|---|---|---|---|
|
acunetix |
The field name is specific to the plugin |
Equals: Does not equal: Is greater than: Is greater than or equals: Is less than: Is less than or equals: Contains: |
The value will contain a number, word, |
Next, the Actions are created. You can use 5 different actions and set properties within them to configure the Rule.
| Action | Example | Properties |
|---|---|---|
| ChangeValueAction | Dradis::Pro::Rules::Actions::ChangeValueAction.create!(rule: nessus1, properties: { field: 'CVSSv3.BaseScore', new_value: '0.0' }) |
|
| TagAction | Dradis::Pro::Rules::Actions::TagAction.create!(rule: nessus1, properties: { tag_name: tag_high }) |
tag_name: populate with one of the variables at the beginning of the .rb file where the tags are defined. |
| DiscardAction | Dradis::Pro::Rules::Actions::DiscardAction.create!(rule: nessus1) |
None |
| FindMatchAction | Dradis::Pro::Rules::Actions::FindMatchAction.create!(rule: nessus1, properties: { plugin: :issuelib }) |
plugin: populate with :issuelib |
| SwapBodyAction | Dradis::Pro::Rules::Actions::SwapBodyAction.create!(rule: nessus1, properties: { plugin: :issuelib, field: 'Title', value: 'SQL Injection'}) |
|
The end of rules_seed.rb file above creates Rules to automatically tag Nessus findings based on CVSS score. For example, the "Tag High" rule shown above creates a Rule in the Rules Engine like:
The Templates
-
The /templates/methodologies subfolder
This folder contains any methodology templates that you want to add to your instance. Example,
OWASPv4_Testing_Methodology.xml. -
The /templates/notes subfolder
This folder contains any note templates that you want to add to your instance. Example,
issue.txt. -
The /templates/plugins subfolder
This folder contains any Plugin Manager configurations that you want to add to your instance.
The /templates/plugins subfolder can configure the Plugin Manager for any plugin that we support.
To create a configuration via a kit, first create a subfolder using the name of the plugin. For example, /templates/plugins/nessus. Then, add
.templatefiles that contain the configuration you want to apply within the Plugin Manager. For example, to configure the Nessus Evidence template to create a Port and an Output field, create a /templates/plugins/nessus/evidence.template that looks like:#[Port]# %evidence.port% #[Output]# bc.. %evidence.plugin_output%Make sure to reference the fields available in the plugin and the different template names available in our Plugin Manager guide. For example, since Nessus uses
report_itemfor Issue fields, use a /templates/plugins/nessus/report_item.template for Issue fields from Nessus. -
The /templates/projects subfolder
This folder contains any project templates that you want to add to your instance. Example,
dradis-template.xml. -
The /templates/reports subfolder
This folder contains 3 more subfolders:
/templates/reports/excel
/templates/reports/html_export
/templates/reports/word
Add any report templates that you want to add to your instance. Example,
dradis_template-client.v0.1.docm(in the /word subfolder),dradis_template-excel-client.v0.1.xlsm(in the /excel subfolder),dradis_html_template.html.erb(in the /html_export folder).Configure Report Template Properties
To automatically configure report template properties on upload, create an
.rbfile that has the same filename as your report template. For example, if your report template is "dradis_welcome_template.v0.5.docm", the configuration file name would bedradis_welcome_template.v0.5.rb.Example .rb file:
ReportTemplateProperties.create_from_hash!(
  definition_file: File.basename(__FILE__, '.rb'),
  # plugin_name: 'excel',
  plugin_name: 'word',
  # plugin_name: 'html_export',
  content_block_fields: {
    'Conclusion' => [
      {name: 'Title', type: 'string', values: nil},
      {name: 'Type', type: 'string', values: 'Conclusion'}
    ],
    'Scope' => [
      {name: 'Title', type: 'string', values: nil},
      {name: 'Type', type: 'string', values: 'Scope'}
    ]
  },
  document_properties: [
    'dradis.project',
    'dradis.client'
  ],
  evidence_fields: [
    {name: 'Details', type: 'number', values: nil}
  ],
  issue_fields: [
    {name: 'Title', type: 'string', values: nil},
    {name: 'CVSSv3.BaseScore', type: 'number', values: nil}
  ],
  sort_field: 'CVSSv3.BaseScore'
)
First, set plugin_name: to excel, word, or html_export as required.
Then, set content_block_fields by creating Content Blocks. Set the Block Group name at the first level (e.g. 'Conclusion'), then create a new row for each field that needs to be defined. Use Name as the field name, set type to either string or number, and set values as needed.
Create a list of document_properties (e.g. dradis.project).
Create evidence_fields and issue_fields as needed. Use Name as the field name, set type to either string or number, and set values as needed.
The sort_field is optional. If you want to sort issues by default in your template, you can sort by an Issue field that exists in the issue_fields section and is a number. Sorting is in descending order - highest to lowest.
Uploading a kit
Sign in as an Administrator.
Navigate to Templates > Kit Upload.
-
Use the Drop zone or the blue Add kit button to select your
kit.zipfile.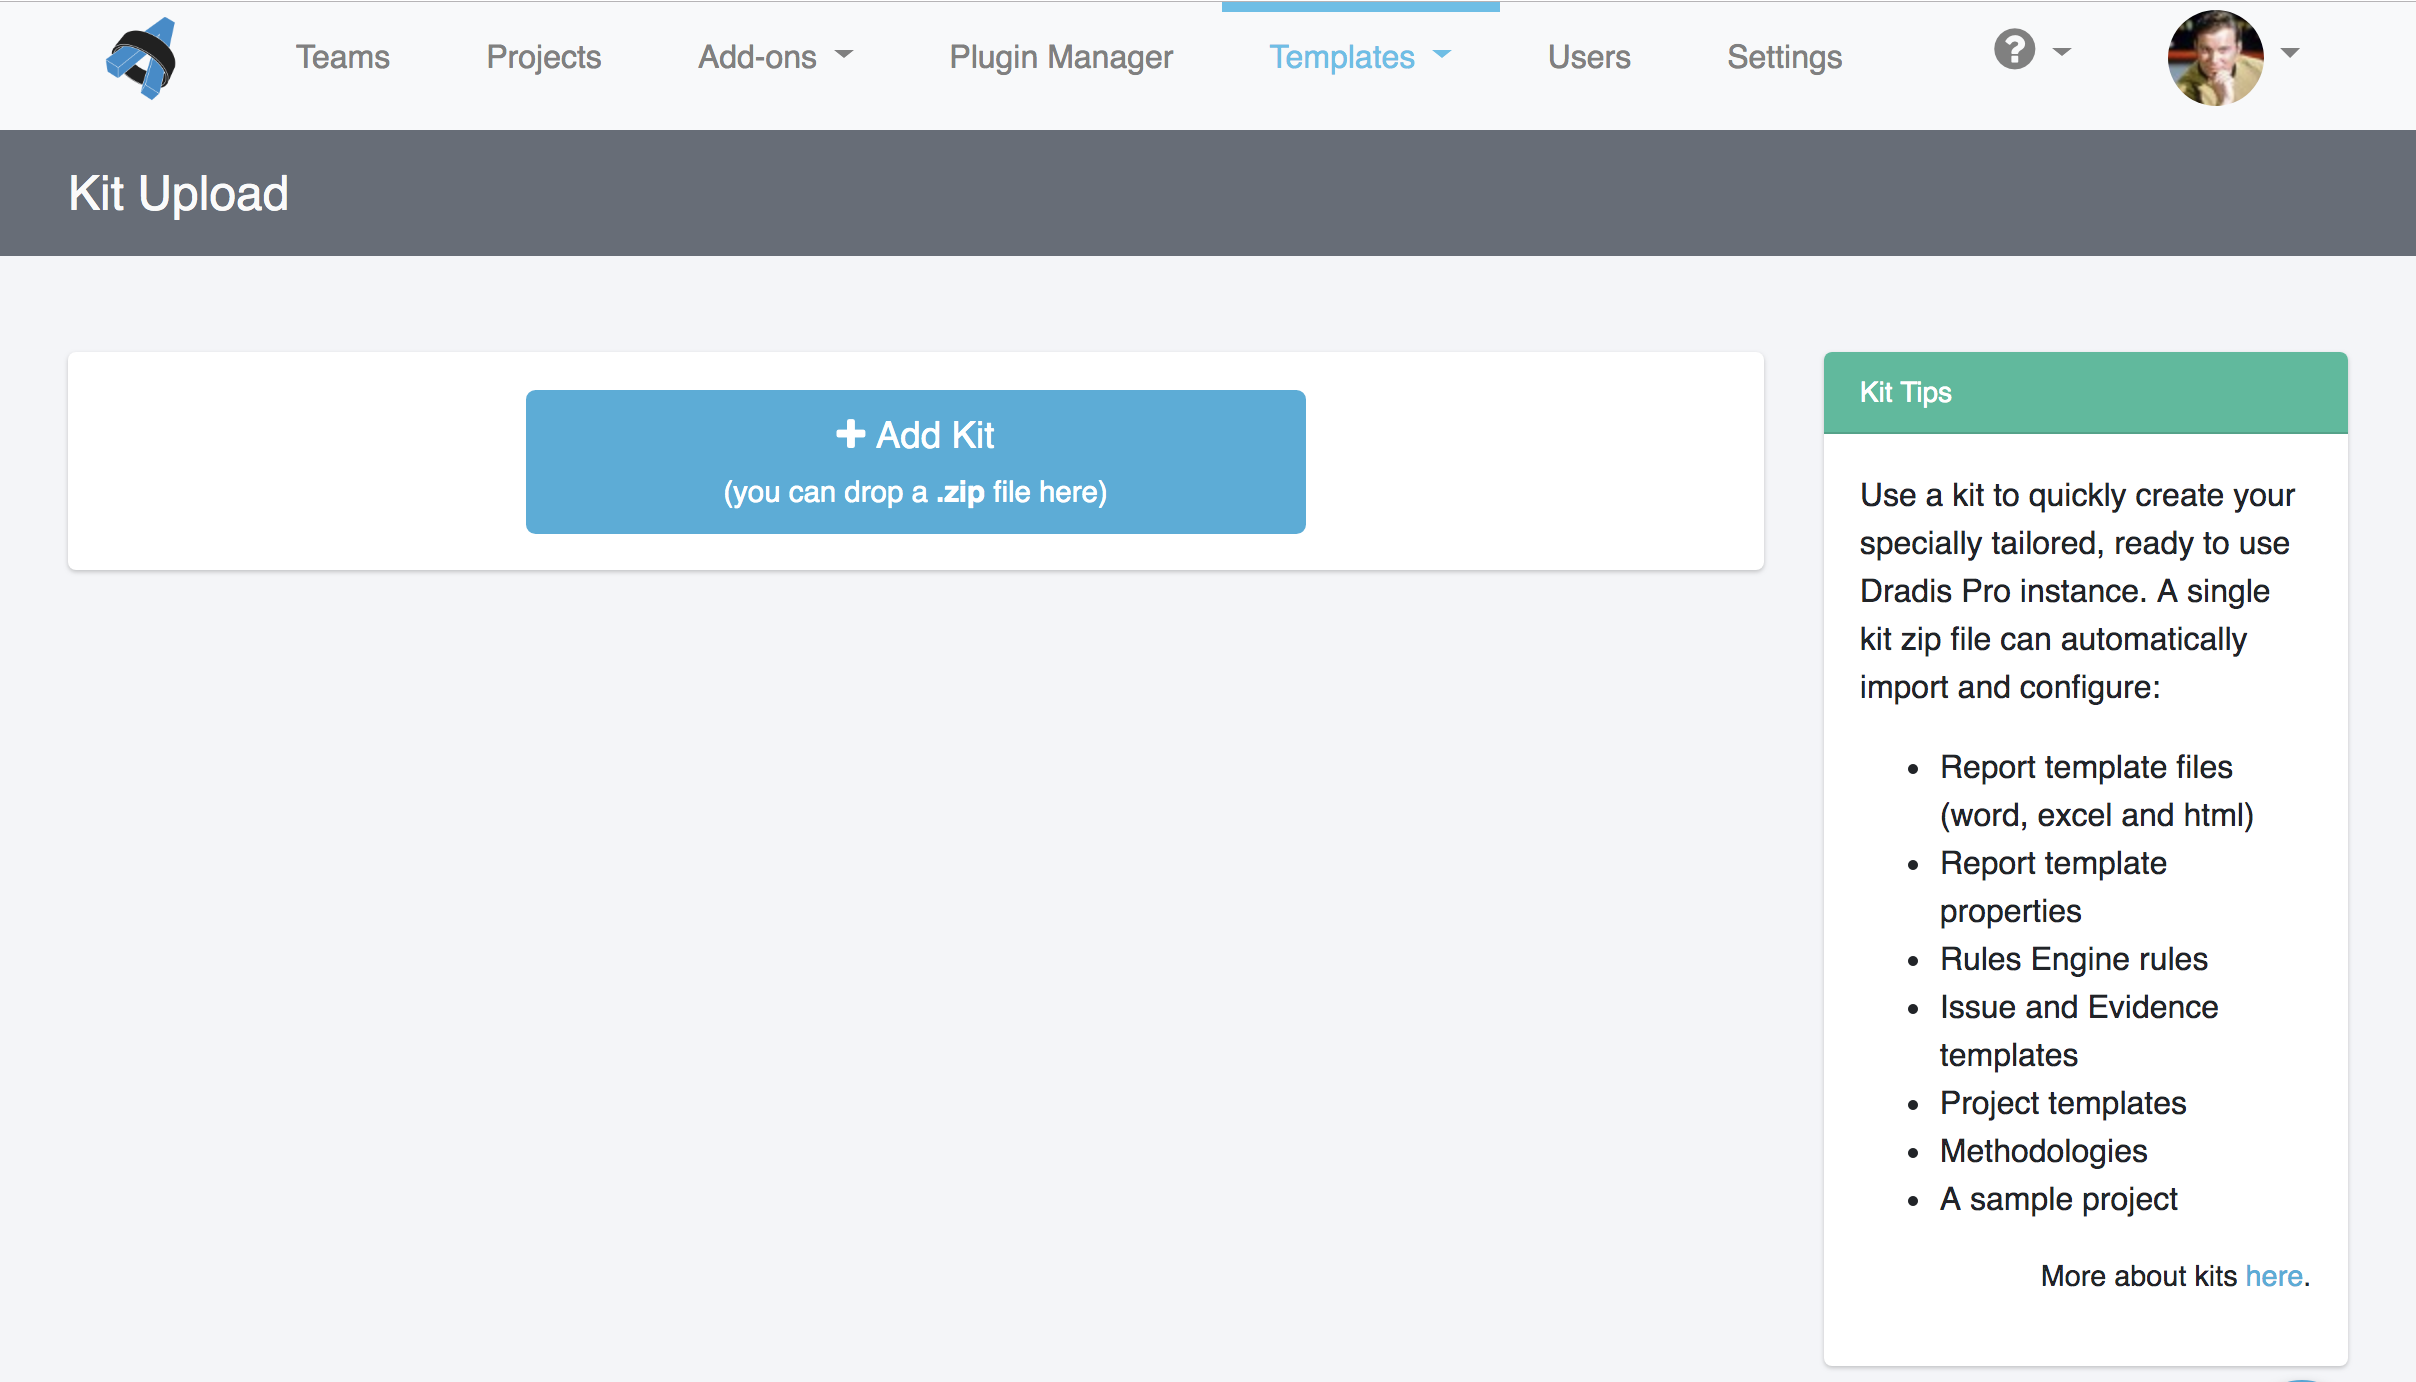
Then, just click the green Start button to upload it.
-
The on-screen log will display all the changes that are being made. Wait until it displays
Worker process completedbefore moving on.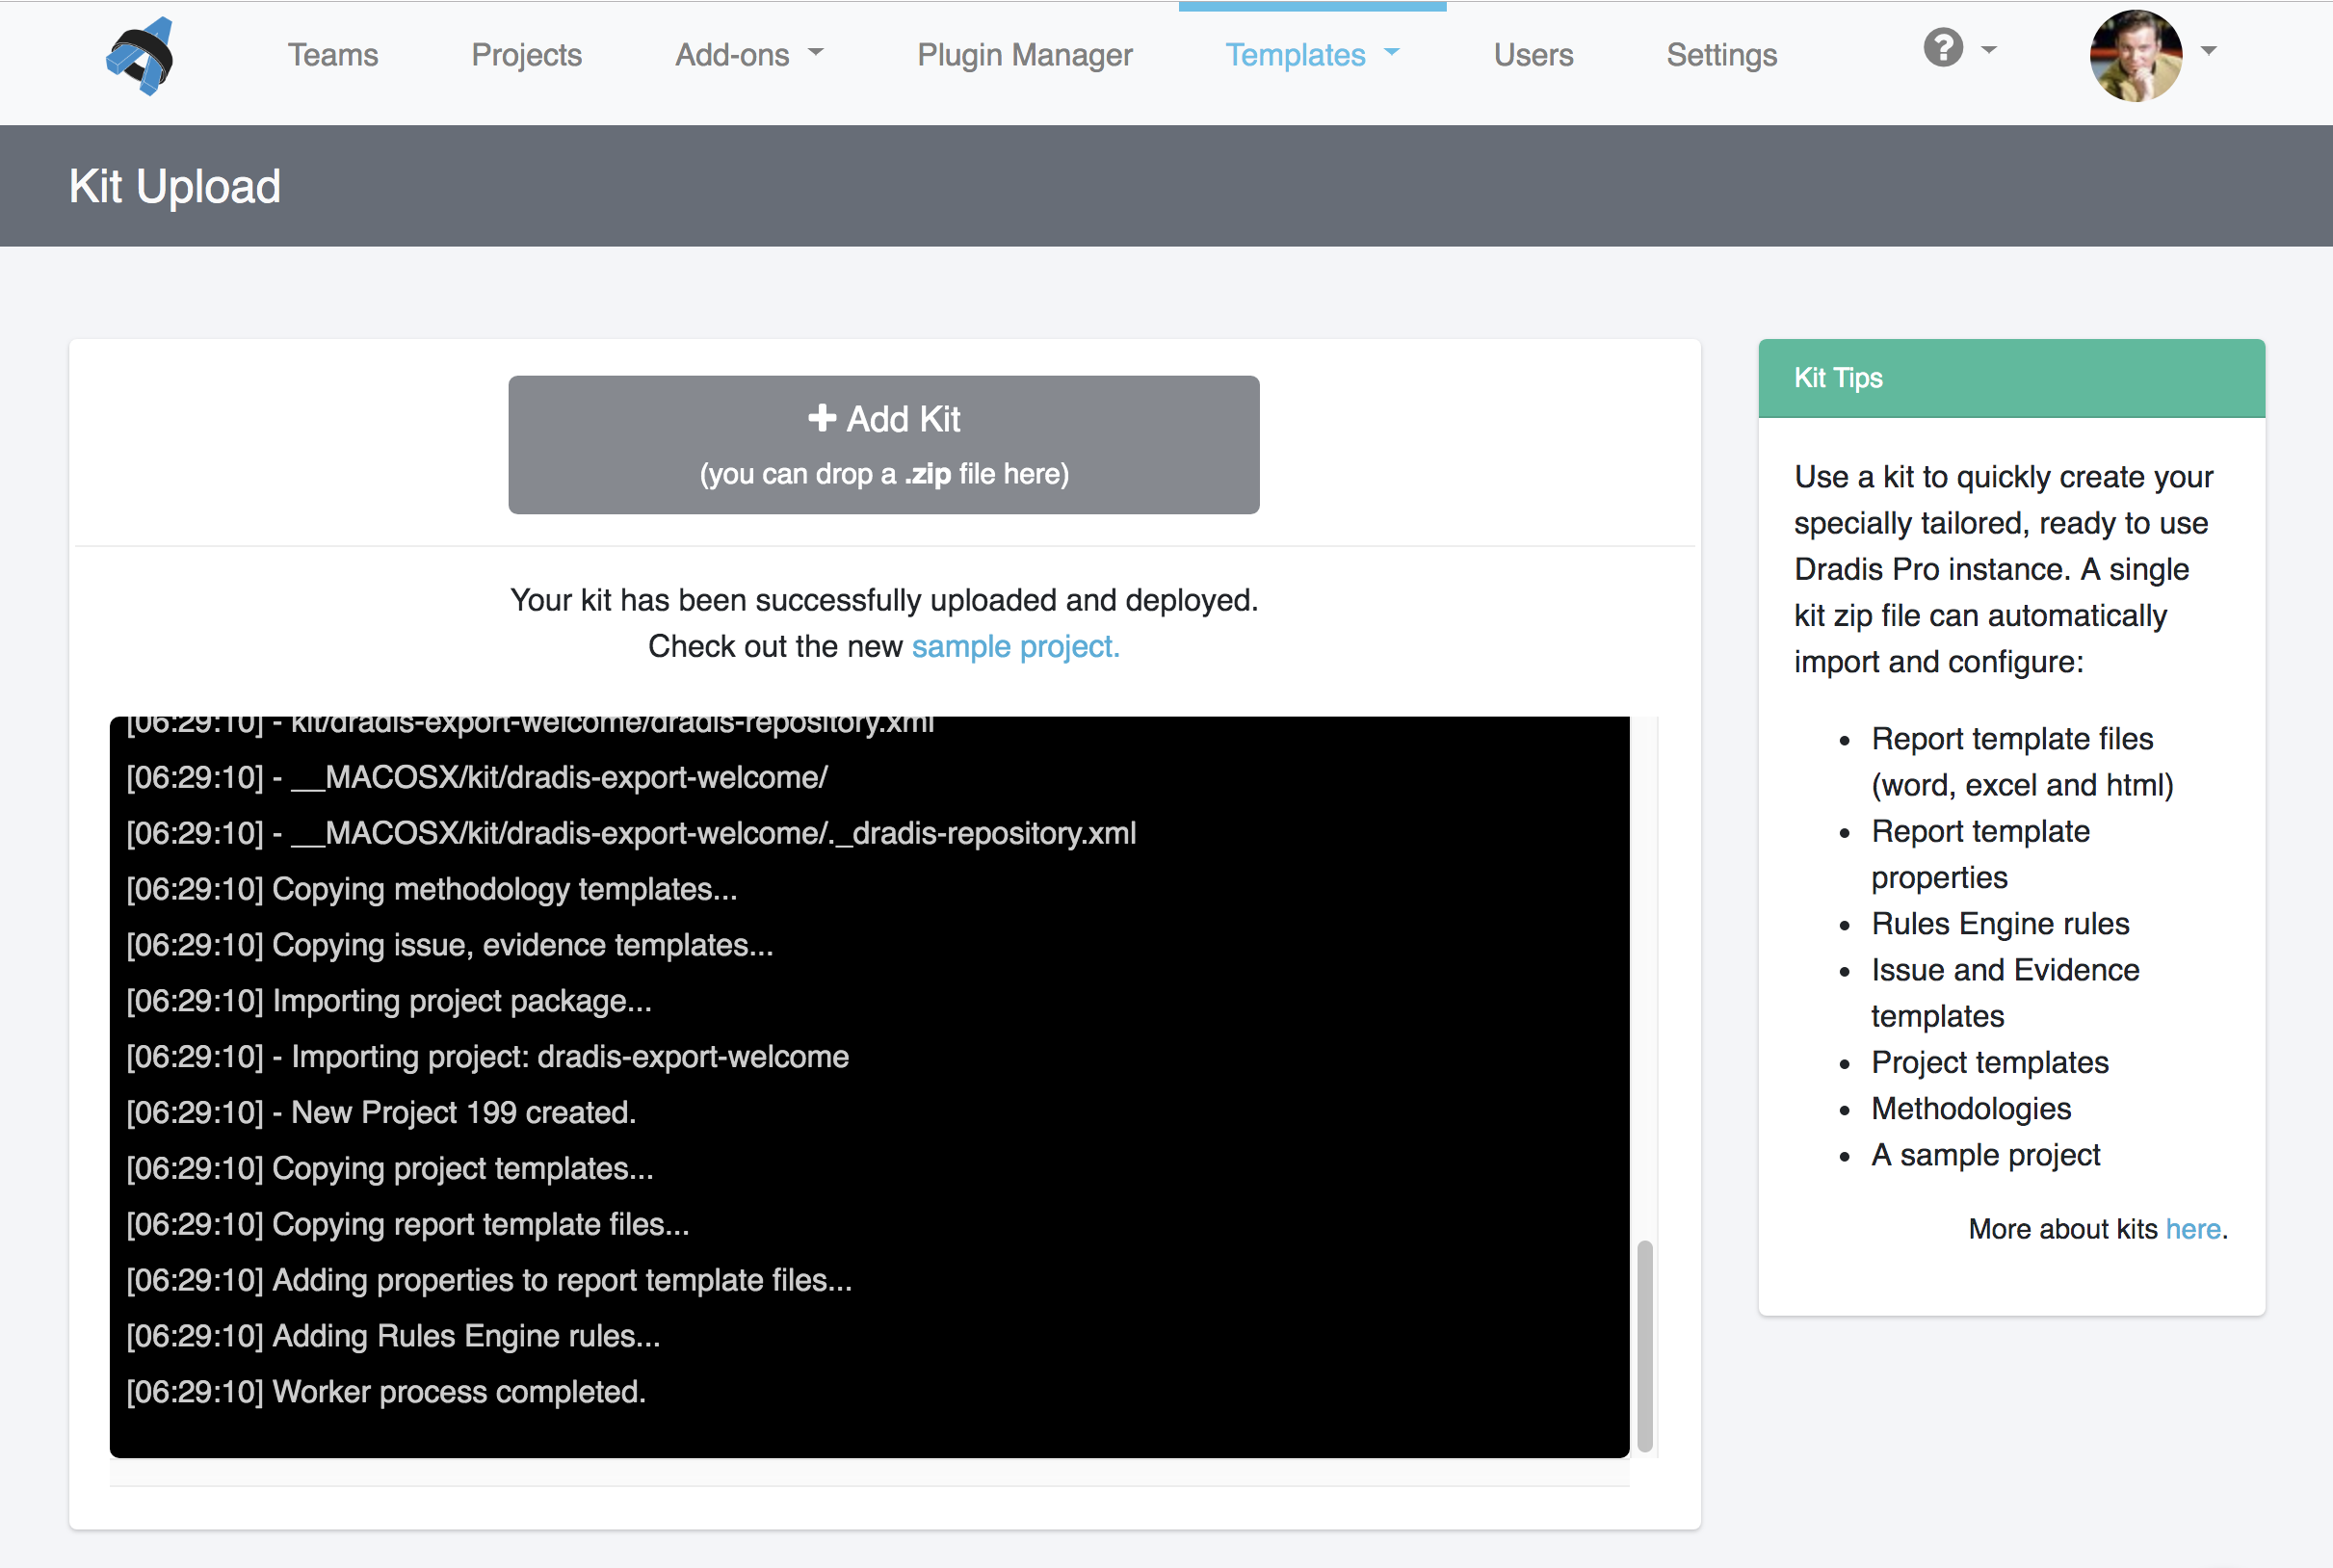
Uploading a kit via the command line
SCP your kit (e.g.
kit.zip) to your Dradis instance (e.g. to the/tmpfolder).-
Run the following commands in the console as dradispro:
$ cd /opt/dradispro/dradispro/current/
$ RAILS_ENV=production bundle exec thor dradis:setup:kit --file=/tmp/kit.zip
Make sure to update the filename and path to match yours!
Next help article: System settings →