Integrating Plugin Output with your Dradis Pro Template
This guide contains:
- Start with your Issue/Evidence templates
- Pick the Plugin and the correct template
- Customize the content in the Editor
- Tips and Tricks
If you haven't done so yet, now would be a good time to review the Note Templates section of the Administration guide.
Think of the Mappings Manager as the magic decoder ring for all the different tools. None of them speak the same language! One calls a field Description, another calls it Details, a third calls it Discussion. And, by default, exactly none of them will match your custom report template.
Before you upload tool output into your project, make sure that your Mappings Manager is configured to match your templates' report template properties.
Start with your Issue/Evidence templates
Make sure that you have decided on the format for your Issues and Evidence and that you've created report template properties that define the fields to be used for each.
Remember, if the format is inconsistent across your Issues, Evidence, etc, you will run into problems when exporting your report. If the format is inconsistent, the Validator can help.
Pick the Plugin and the correct template
Make sure you're signed in as an Administrator. Then, navigate to the Mappings Manager in the header of your instance.

Select the correct plugin from the left-hand sidebar. We'll use Nessus in this example.

Pay special attention to which template you are currently editing (selectable from the dropdown; typically Issue, Evidence, or Note). Make sure to map the correct available plugin fields to the fields in your selected template.
Switch to another template using the dropdown as needed.
You can also switch which report template to validate against from the dropdown to the right.
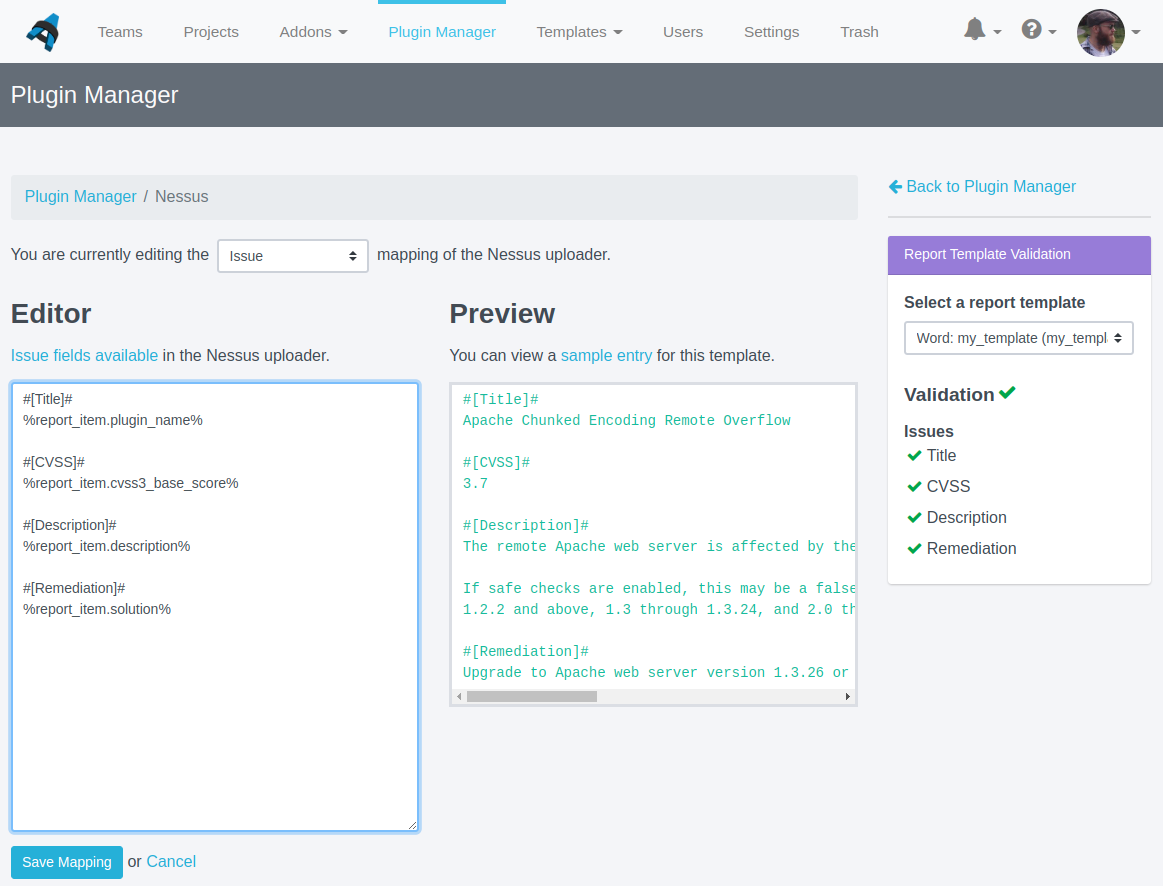
Customize the content in the Editor
-
Select your preferred report template to validate against on the right, and/or copy a Note Template that you would like to use.
In this example, let's use the following sample
Issuetemplate:#[Title]#
#[CVSS]#
#[Description]#
#[Remediation]# Delete the existing content in the Editor pane and paste the contents of your Issue or Evidence template into the Editor.
-
Click the Available fields link above the Editor pane to see what content is available in the tool output.
Copy the available field (e.g.
element.cvss_base) from the list of Available fields, then paste it into the Editor. Make sure that you wrap your field with%and check the Preview pane to confirm that the field is previewing as expected.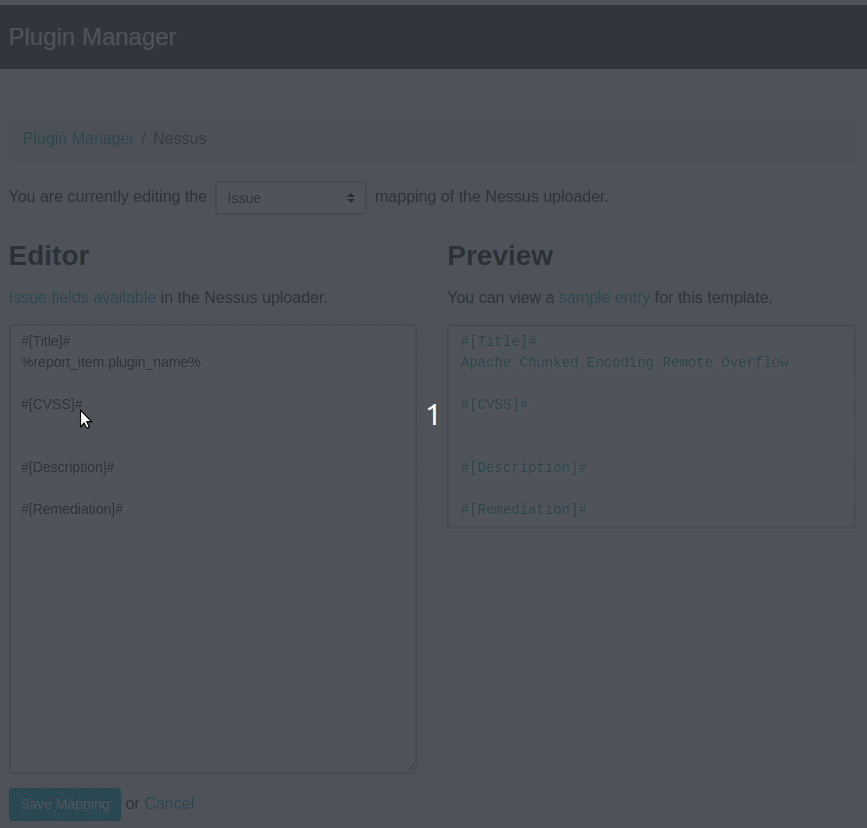
-
Repeat this process for each field in the Editor. Make sure to click Save Mapping before moving on!
Tips and Tricks
In some situations, you'll want to format the data a little more in the Plugin Manager.
You can automatically apply code blocks, add static text or even create tables.
To manipulate and actually change the imported data, check out the options in the Rules Engine.
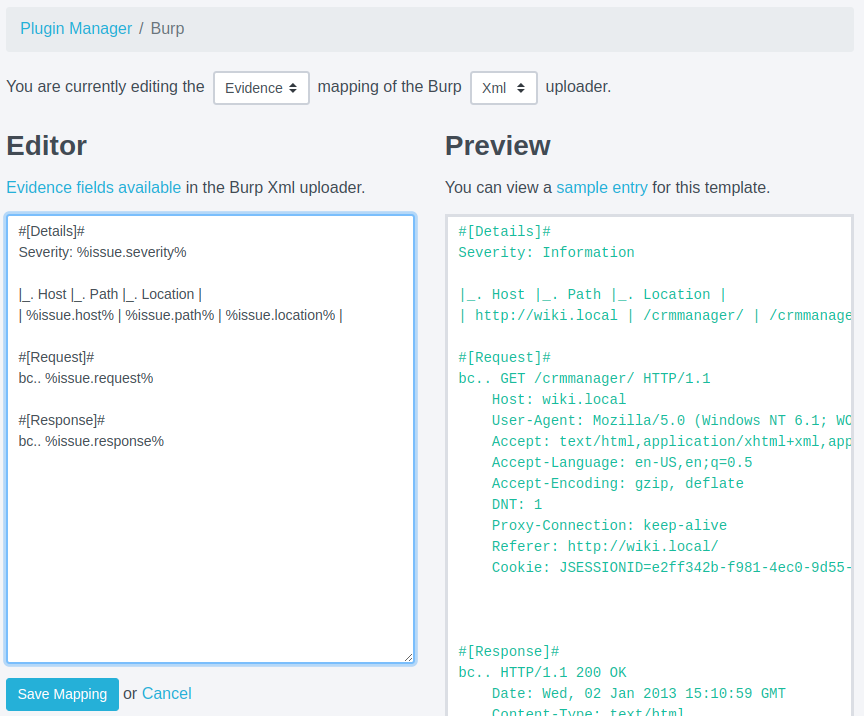
Use Code Blocks automatically
If you have output that is going to contain code, you'll want to wrap it in a code block. Without the code block, your Word report may try to include code (especially XML) into the internal XML structure of the Word document and cause chaos.
To prevent this chaos, just include the bc.. marker before the field name in the Editor. Make sure to use the double-dot version of the code block marker to accomodate multiple lines of code in the field.
For example:
#[Request]#
bc.. %issue.request%
Include Static Text
If you want, you can also include static text in the Editor. This will be imported as static text and is helpful when you're including context for specific values.
For example, instead of just including the severity value under #[Details]# without context, we can add static text like:
#[Details]#
Severity: %issue.severity%
Create Tables
You can create Custom Tables within your Dradis project or here in the Mappings Manager using the Textile syntax.
To display the data in a table, we just need to use the Textile format like:
|_.Header|_.Row|
|Body|Row|
For example, we can create a table that contains the Host/Path/Location details for our instance of Evidence:
|_.Host |_.Path|_.Location|
|%issue.host%|%issue.path%|%issue.location%|
Next help article: Combining Plugins →