Creating Word reports with XSL transformations
This guide covers how you can use XSL transformations to generate advanced Word reports.
This guide contains:
- Why use XSL transformations?
- Introduction to WordprocessingML
- Introduction to XSLT
- Creating the template
- Converting the template into an XSL transformation
- Adding content to the template
- Providing the content and obtaining final result
- Wrapping up
Why use XSL transformations?
Starting in Word 2003, Word documents are built using XML in what Microsoft calls the WordprocessingML.
Unfortunately, this is not such good news as one would think. The WordprocessingML language is quite complex and it takes some getting used to. You check out the Overview of WordprocessingML in MSDN.
On the bright side, there are plenty of tools out there to work with XML documents. We are going to make use of one of such tools: XSL transformations (XSLT).
An XSLT document is itself an XML document that contains rules on how to transform an input XML into an output document (you can read more on the XSLT Wikipedia page).
In this case we are going to convert an input XML containing the information stored in your Dradis repository into an output document in the WordprocessingML format.
Introduction to WordprocessingML
Unfortunately WordprocessingML is a huge topic. The bare minimum WordprocessingML document is:
<?xml version="1.0"?>
<?mso-application progid="Word.Document"?>
<w:wordDocument
  xmlns:w="http://schemas.microsoft.com/office/word/2003/wordml">

  <w:body>
    <w:p>
      <w:r>
        <w:t>Hello, World.</w:t>
      </w:r>
    </w:p>
  </w:body>
</w:wordDocument>
</xml>
If you copy and paste the above text into a file and have Word installed, Windows will detect this XML (because of the mso-application declaration) and will launch Word if you double-click it.
In the example you can see some of the elements we will have to deal with when creating the template:
w:prepresents a paragraphw:rrepresents a text run, a contiguous set of WordprocessingML components with a consistent set of propertiesw:trepresents a text
Other common items you will have to work with are tables, table rows and table cells (w:tbl, w:tr, and w:tc respectively).
To get familiar with the other elements you will need to review the Overview of WordprocessingML and sharpen your Google skills.
Unfortunately Word is not going to keep your XML as clear and simple as our example. Try opening the file in Word, adding a second line to the document and saving it again. We have gone from 280 bytes to a 10KB of document!
This is because Word starts including styling information, additional namespaces and a plethora of other bits and pieces. Thankfully, we will be able to ignore most of it.
Introduction to XSLT
Say we have a very simple XML:
<dradis>
  <notes>
    <note>
    <fields>
      <Title>Directory Listings</Title>
      <!-- [...] -->
    </fields>
  </note>
  <note>
    <fields>
      <Title>Out-of-date Apache</Title>
      <!-- [...] -->
    </fields>
  </note>
  </notes>
</dradis>
And a simple XSLT document:
<?xml version="1.0" encoding="UTF-8"?>
<xsl:stylesheet
  version="1.0"
  xmlns:xsl="http://www.w3.org/1999/XSL/Transform">

  <xsl:output method="xml" indent="yes"/>
  <xsl:template match="/">

    <xsl:processing-instruction name="mso-application">
      <xsl:text>progid="Word.Document"</xsl:text>
    </xsl:processing-instruction>
    <w:wordDocument
      xmlns:w="http://schemas.microsoft.com/office/word/2003/wordml">

      <w:body>
        <xsl:for-each select="dradis/notes/note/fields">
        <w:p>
          <w:r>
            <w:t><xsl:value-of select="Title"/></w:t>
          </w:r>
        </xsl:for-each>
      </w:body>
    </w:wordDocument>

  </xsl:template>
</xsl:stylesheet>
The above transformation will create a Word document with a new paragraph containing the Title field for every Note in the source XML:
<?xml version="1.0"?>
<?mso-application progid="Word.Document"?>
<w:wordDocument
  xmlns:w="http://schemas.microsoft.com/office/word/2003/wordml">

  <w:body>
    <w:p>
      <w:r>
        <w:t>Directory Listings</w:t>
      </w:r>
    </w:p>
    <w:p>
      <w:r>
        <w:t>Out-of-date Apache</w:t>
      </w:r>
    </w:p>
  </w:body>
</w:wordDocument>
If you want to verify this by yourself, create the dradis_source.xml and simple.xslt files in a temporary folder and fire the Ruby interpreter (install the Nokogiri gem first if it is not installed):
$ gem install nokogiri --no-rdoc --no-ri
$ irb -rrubygems
>> require 'nokogiri'
>> source = Nokogiri::XML( File.read('dradis_source.xml') )
>> xslt = Nokogiri::XSLT( File.read('simple.xslt') )
>> puts xslt.transform( source )
Creating the template
Now that we have a basic understanding of the inner workings of the WordprocessingML and XSLT technologies we can start working on our Dradis Pro template.
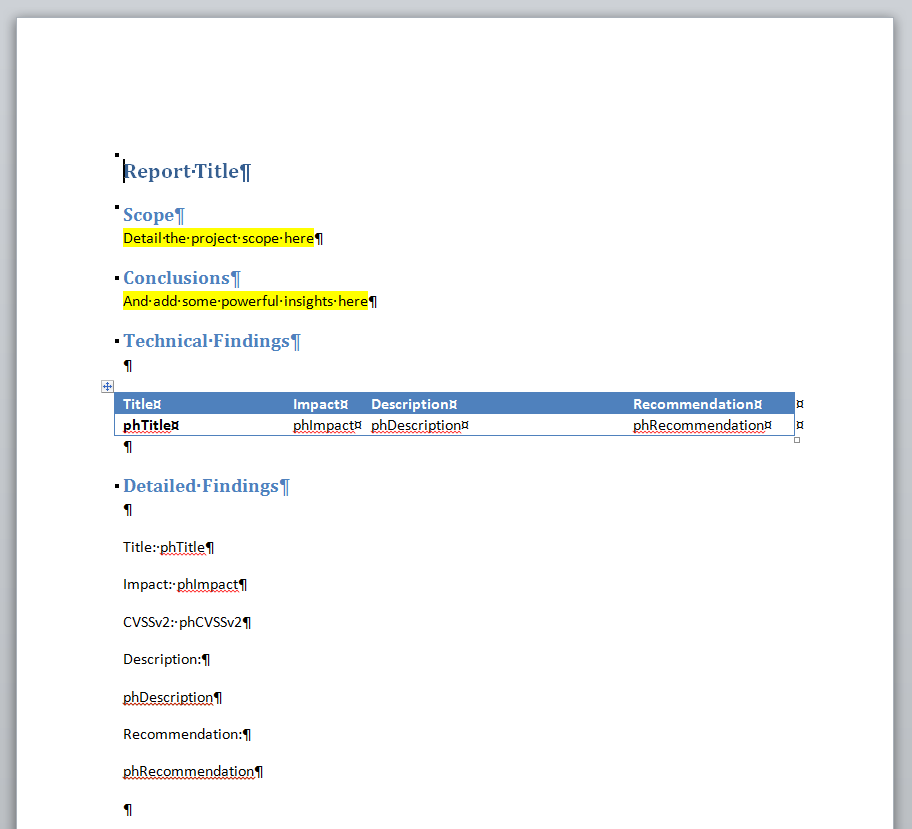
Open Word and create a new document. You can also start from your existing reporting template but we are going to keep things simple in this guide. A very basic report skeleton could look like this:

We could save this document as XML and start working on it, but we are going to make our life easier by adding some placeholders:
Now we are ready to convert this into an XSL transformation. Save the document (File > Save As) as Word 2003 XML Document. Mine is about 25 KB.
Converting the template into an XSL transformation
The first thing we need to do with our document to convert it into an XSLT is to replace the Word document preamble with an XSLT preamble. Lets create a copy of the document and rename it to template.xslt.
Open it in a text-editor and replace the Word preamble:
<?xml version="1.0"?>
<?mso-application progid="Word.Document"?>
With the XSLT preamble:
<?xml version="1.0" encoding="UTF-8"?>
<xsl:stylesheet
  version="1.0"
  xmlns:xsl="http://www.w3.org/1999/XSL/Transform">

  <xsl:output method="xml" indent="yes"/>
  <xsl:template match="/">

    <xsl:processing-instruction name="mso-application">
      <xsl:text>progid="Word.Document"</xsl:text>
    </xsl:processing-instruction>

    <w:wordDocument ...
And then go all the way down to the bottom and close the XSLT tags:
  </xsl:template>
</xsl:stylesheet>
So now officially your template.xslt is a well-formed XSLT document. It does not do anything interesting, but it is a start.
Adding content to the template
Now comes the tricky part. We need to navigate through the source of the XSLT document to locate the placeholders we created for our fields.
For instance, the first one is going to be the phTitle placeholder in the first cell of the table. Using your editor's search function look for phTitle. Mine is in line 12, column 21689 but your mileage may vary.
Because we know this is a table cell, we know that our placeholder is going to be locate within a set of w:tc tags. After finding them and indenting the code around them we have:
<!-- Title -->
<w:tc>
  <w:tcPr><!-- [...] --></w:tcPr>
  <w:p wsp:rsidR="00DC17EC" wsp:rsidRPr="002B061B" wsp:rsidRDefault="002B061B" wsp:rsidP="002B061B">
  <w:pPr><!-- [...] --></w:pPr>
  <w:proofErr w:type="spellStart"/>
    <w:r wsp:rsidRPr="002B061B">
      <w:rPr><w:b/><w:b-cs/></w:rPr>
      <w:t>phTitle</w:t>
    </w:r>
  <w:proofErr w:type="spellEnd"/>
  </w:p>
</w:tc>

<!-- Impact -->
<w:tc><!-- [...] -->
There is a lot in the markup for that table cell. Thankfully you can ignore most of it. For instance, w:tcPr contains cell properties, all the wsp attributes can be ignored or deleted, w:pPr are paragraph properties, etc.
One interesting thing to note is the w:proofErr block. This has been added by word because our placeholder (phTitle) is not a valid English word. For our purposes we can ignore it but lets just say that if your placeholder had been Title you would not see this w:proofErr element.
The next thing we need to do is to replace our placeholder text with an XSLT xsl:value-of tag that extracts the field from the source (note that I have also removed the w:proofErr element):
<!-- Title -->
<w:tc>
  <w:tcPr><!-- [...] --></w:tcPr>
  <w:p wsp:rsidR="00DC17EC" wsp:rsidRPr="002B061B" wsp:rsidRDefault="002B061B" wsp:rsidP="002B061B">
  <w:pPr><!-- [...] --></w:pPr>
  <w:r wsp:rsidRPr="002B061B">
    <w:rPr><w:b/><w:b-cs/></w:rPr>
    <w:t><xsl:value-of select="Title"/></w:t>
  </w:r>
  </w:p>
</w:tc>

<!-- Impact -->
<w:tc><!-- [...] -->
We need to repeat this (tedious) process for the other cells in the row.
Once that is done, we need to ensure that a new row is created for each note in our Dradis Pro source XML. We do this by enclosing the w:tr element within an XSLT xsl:for-each tag (I have removed the wsp attributes in the w:tr tag):
<xsl:for-each select="dradis/notes/note/fields">
  <w:tr>
    <!-- Title -->
    <w:tc><!-- [...] -->
    <!-- Impact -->
    <w:tc><!-- [...] -->

    <!-- [...] -->
  </w:tr>
</xsl:for-each>
The code above will ensure that a new table row (i.e. a new @w:tr@ element) will be created for each Dradis note.
Now we need to repeat the same process for the Technical Details section of our report. It is going to be a bit trickier this time because the fields are not enclosed by table cells or table rows but in essence this is what we have to do:
- Locate the placeholder
- Replace the placeholder with a
xsl:value-ofXSLT element - Repeat for every field
- Enclose the block in a
xsl:for-eachXSLT element
Using the editor's search function, search again for phTitle. Once you find it, walk backwards to the previous paragraph (an empty one) and the one before (containing the Detailed Findings header). See the snippet below (superfluous wsp attributes have been removed) where I have already replaced the phTitle with an xsl:value-of:
<w:p>
  <w:pPr><w:pStyle w:val="Heading2"/></w:pPr>
<w:r><w:t>Detailed Findings</w:t></w:r>
</w:p>

<w:p/>

<w:p>
  <w:r><w:t>Title: </w:t></w:r>
  <w:r><w:t><xsl:value-of select="Title"/></w:t></w:r>
</w:p>
<!-- [...] -->
The process of going through the rest of the fields is straightforward. And once we have identified all the paragraphs that compose the block we want to repeat for each issue, we just need to enclose it in a xsl:for-each element:
<w:p/>
<xsl:for-each select="dradis/notes/note/fields">
  <w:p>
    <w:r><w:t>Title: </w:t></w:r>
    <w:r><w:t><xsl:value-of select="Title"/></w:t></w:r>
  </w:p>

  <w:p>
    <w:r><w:t>Impact: </w:t></w:r>
    <w:r><w:t><xsl:value-of select="Impact"/></w:t></w:r>
  </w:p>

  <!-- [...
  CVSSv2, Description, Recommendation
  ...] -->
  <w:p/>
</xsl:for-each>
We are all done here. Lets wrap this up.
Providing the content and obtaining final result
That's it for now. We just need to copy the template across and use it. Follow the instructions on the Report Templates page of the Administration guide.
Once the template is uploaded into Dradis, you can generate a report through the Export menu.
Follow the instructions on the Generate your report page of the Working with Projects guide.
Wrapping up
As you can see, XSL transformations are a powerful and versatile technology. They are not for the faint of heart though.
This guide only scratches the surface but there is much more that can be done with XSLT (think images, charts, the xsl:choose element, etc.). There are plenty of resources out there to help you with WordprocessingML and XSLT. It will take some time but it will be worth it.
However, if you currently do not have the time to fully investigate this on your own, the Dradis team has years of experience and can help you create a custom template.
Contact our support team if you'd like to learn more about our report template conversion service.
Great job, you reached the end of the guide! Have you read all of them?