Create a Custom Export Add-on
If your answer is not here the Community Forums are your best bet.
Introduction to export add-ons
Before you get started with this guide, make sure you are running Dradis v3.0 or later (check the footer to confirm your version).
If needed, install the latest version of Dradis from Git with these instructions before moving on.
In this guide we're going to walk through the process to create a custom export add-on. An export add-on will allow you to generate a report from your Dradis project in any format you want.
In this case, we're creating a simple JSON export add-on. Our JSON exporter is going to open up a new browser tab and display all of the Issues in your project in JSON strings.
1. Clone your Add-on
The easiest way to start building is to clone one of the existing export add-ons to use as a working guide as you customize your export add-on.
Which of the available export add-ons is closest to what you're building?
dradis-csv: CSV export plugindradis-html_export: HTML export plugindradis-json: JSON export plugin
To clone the add-on:
-
Pick an export plugin from the list above to use as a template.
-
Click the link above to open the plugin's GitHub repo.
-
Copy the HTTPS link to clone the repo. In the example below, we're going to clone the
dradis-csvrepo.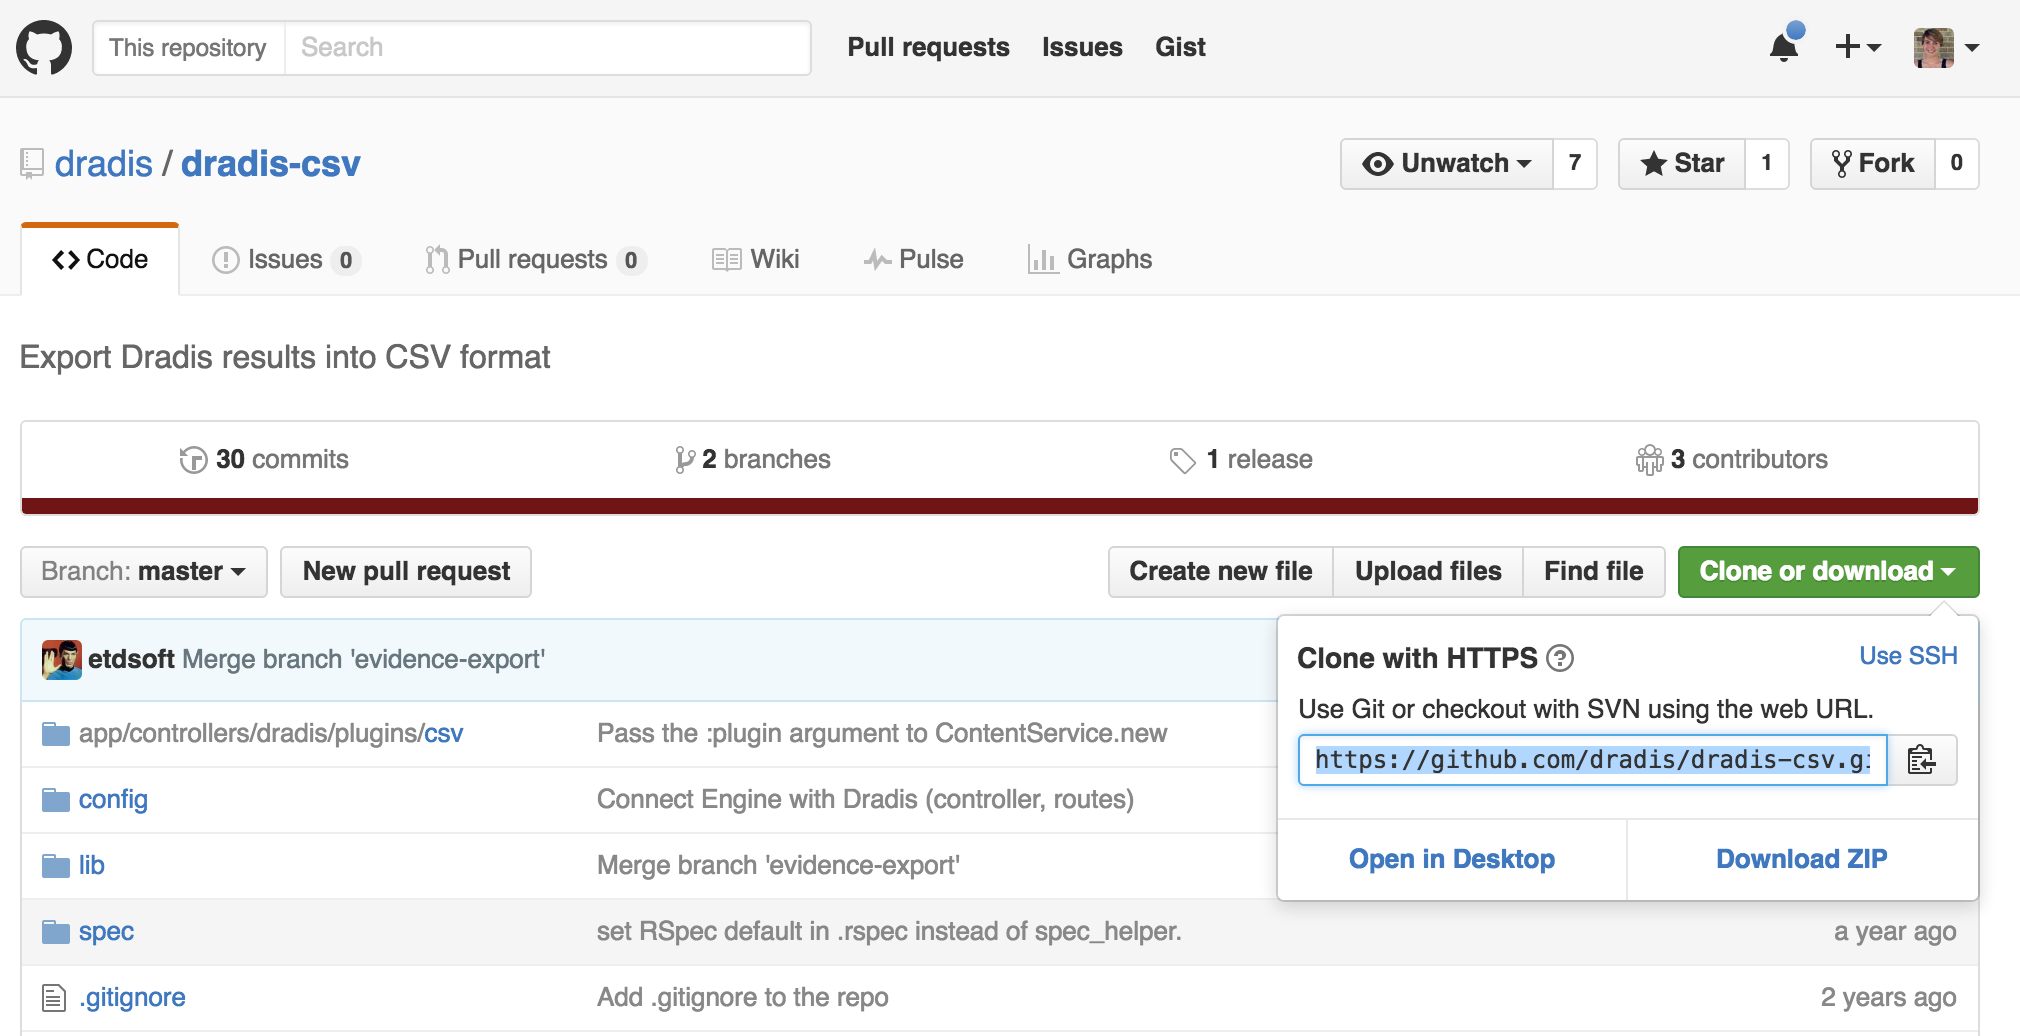
-
Back on your local system, open the terminal and navigate to the folder where you installed
dradis-ce. -
Run the following in the terminal:
$ git clone [repo link]
Paste in the HTTPS link you copied from GitHub! Example:
$ git clone https://github.com/dradis/dradis-csv.git
2. Rename your add-on
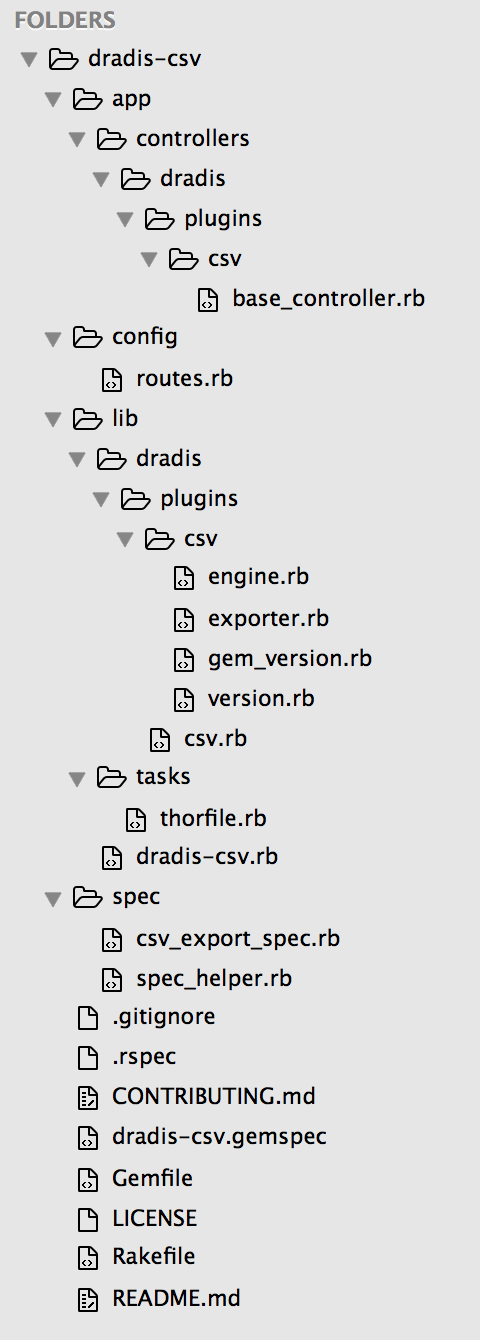
Below is an example of the file structure of a Dradis add-on. Every export add-on uses this basic file structure. If the add-on uses templates (like dradis-html_export), there will also be a templates/ folder.
Rename files and folders
On your local system, rename your folders and files. For the root folder, we recommend using the dradis-[name] naming convention where [name] is a placeholder for your exporter type (e.g. json). In the examples below, we're going to assume you're working with the dradis-csv repo.
-
Rename
dradis-csv/app/controllers/dradis/plugins/csv/to:dradis-[name]/app/controllers/dradis/plugins/[name]/ -
Rename
dradis-csv/lib/dradis/plugins/csv/to:dradis-[name]/lib/dradis/plugins/[name]/ -
Rename
dradis-csv/lib/dradis/plugins/csv.rbto:dradis-[name]/lib/dradis/plugins/[name].rb -
Rename
dradis-csv/lib/dradis-csv.rbto:dradis-[name]/lib/dradis-[name].rb -
Rename
dradis-csv/spec/csv_export_spec.rbto:dradis-[name]/spec/[name]_spec.rb -
Rename
dradis-csv/dradis-csv.gemspecto:dradis-[name]/dradis-[name].gemspec
After renaming, your filesystem should look similar to this:

3. Edit your files
Before you upload the add-on to Dradis, you're going to want to edit files and at least change the references to the old export add-on name (e.g. CSV) and change them to your new name (e.g. JSON).
The instructions below will not cover exactly how to code your specific export add-on. They are simply a high-level overview of the different files that comprise an export add-on to help you get started. This is not an exhaustive list of all of the changes you may need to make. After completing the steps below, you should be ready to start your custom coding.
Note: when the instructions say, "update all references to the old name", it means to go through the file and change things like class names to match the new syntax of your custom export add-on. For example, change csv to json and CSV to JSON). Remember: in Ruby, capitalization counts!
Start by editing the following files:
dradis-[name].gemspec: update this file with the details about you (the author!) and the export add-on you're creating. Update all references to the old name.
dradis-[name]/app/controllers/dradis/plugins/[name]/base_controller.rb: update all references to the old name. Starting at Line #14, you'll need to customize the code to match the format of your add-on.
dradis-[name]/config/routes.rb: update all references to the old name.
dradis-[name]/lib/dradis-[name].rb: update all references to the old name.
dradis-[name]/lib/dradis/plugins/[name].rb: update all references to the old name.
-
dradis-[name]/lib/dradis/plugins/[name]/engine.rb: update all references to the old name.
Starting around Line #5, you'll need to customize the code to match the format of your add-on.
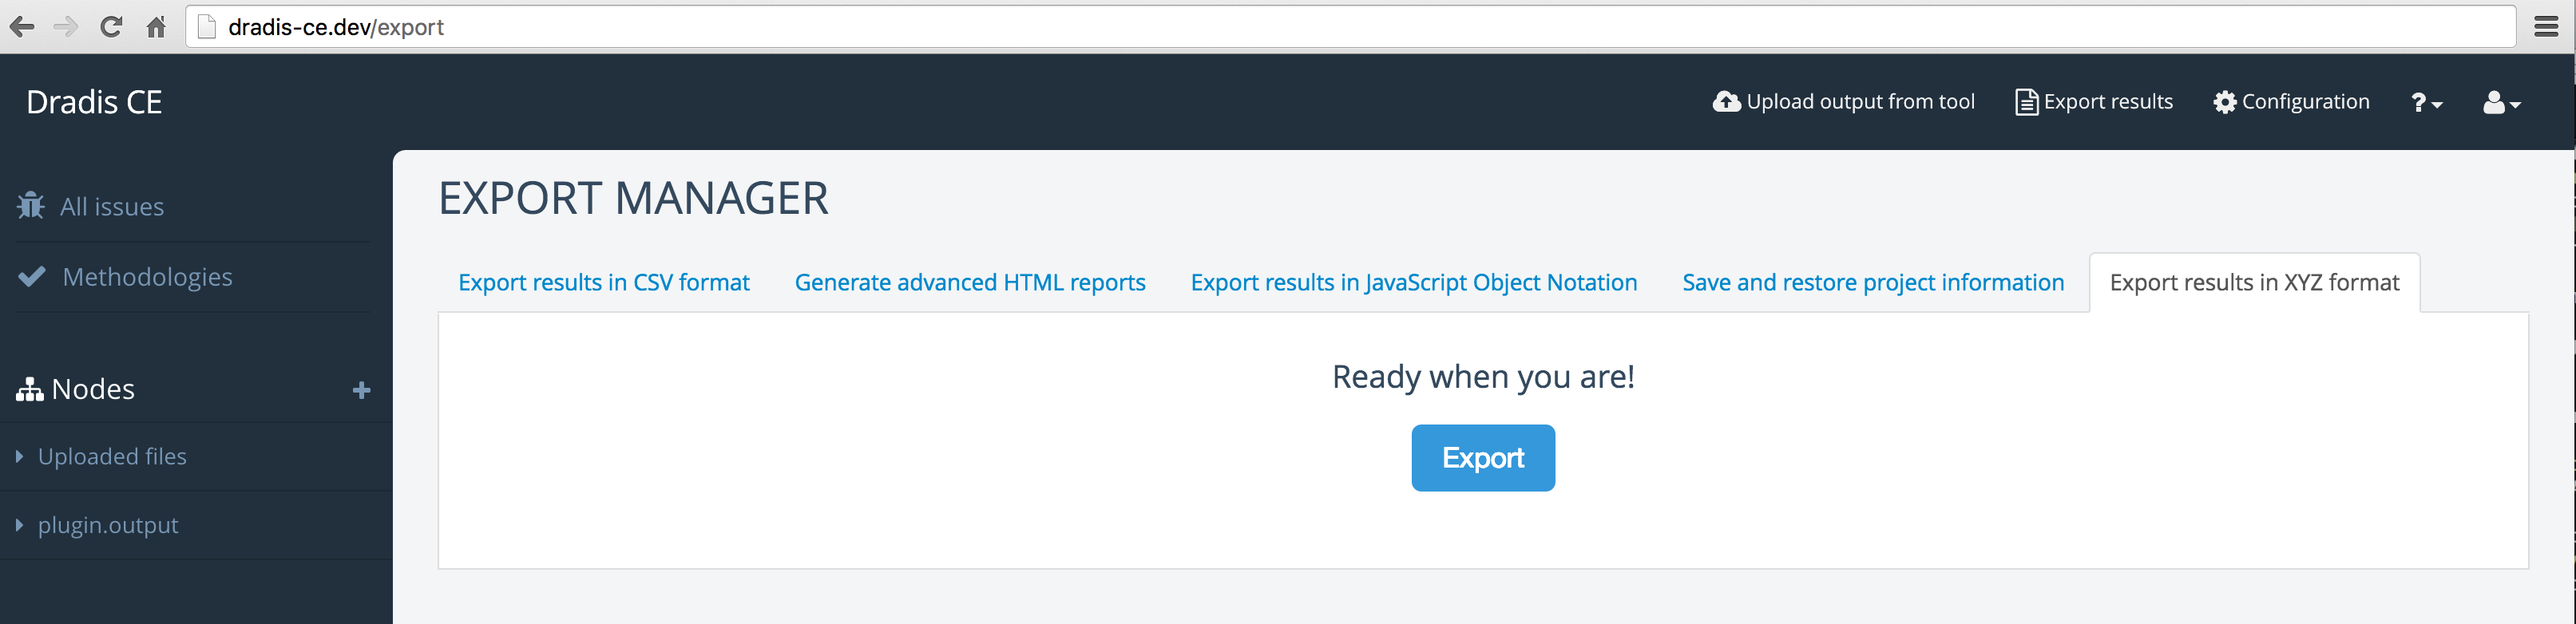
Thedescriptionyou set in Line #7 will be the name that appears in the tab for your exporter at/exportin the webapp: -
dradis-[name]/lib/dradis/plugins/[name]/exporter.rb: update all references to the old name. This is likely the file where you will spend most of your time as it is the controls the way that the content is exported.
The very simplest of export add-ons can be created with the followingexporter.rbfile:module Dradis::Plugins::XYZ class Exporter < Dradis::Plugins::Export::Base def export(args={}) template = args[:template] issues = content_service.all_issues if issues.empty? return "The project didn't contain any issues" else return "The project did contain issues!" end end end end dradis-[name]/lib/dradis/plugins/[name]/gem_version.rb: update all references to the old name.
dradis-[name]/lib/dradis/plugins/[name]/version.rb: update all references to the old name.
dradis-[name]/lib/tasks/thorfile.rb: update all references to the old name. Staring at Line #6, update the code to match your specific export add-on.
dradis-[name]/spec/[name]_export_spec.rb: update all references to the old name.
README.md: update the description of your add-on and remove references to the old add-on. Make sure to leave in the
## Installationsection, just change references likedradis-csvto yourdradis-[name].
Edit depending on your add-on:
dradis-[name]/spec/spec_helper.rb: depending on the add-on you're creating, you may need to edit this file extensively to correctly configure the Rails Environment. In other cases, you may not need to edit this file at all.
Rakefile: depending on the add-on you're creating, you may need to edit this file extensively. In other cases, you may be able to use the exising cloned Rakefile without making any changes.
In most cases you can ignore all the following files:
- LICENSE
- Gemfile (unless extra gems are required for your add-on)
- CONTRIBUTING.md
- .rspec
- .gitignore
4. Load the Add-on to Dradis
-
Open up the
dradis-cefolder on your local system and open filedradis-ce/Gemfile.plugins. -
Add a reference to your new export add-on by adding a line to the
# -- Exportsection:gem 'dradis-[name]', path '../dradis-[name]'
Example:gem 'dradis-json', path '../dradis-json'
Note: make sure that your new export add-on is in the same folder as the other export add-ons on your system so that it matches the filepath you just added toGemfile.plugins. -
On your local system, open the terminal and navigate to the
dradis-cefolder. (Shut down Dradis if it was already running). Then run:$ bundle install $ bundle exec rails server
- Open Dradis in your browser and click Export results in the header. Check out the tab for your new export add-on! Depending on how much custom coding you've already done (and how much is left to do) you may be able to test out your export add-on at this point. Otherwise, continue on to the final step.
5. Test, Edit, Repeat
It's almost a guarantee that you'll be spending a lot of time at this step making changes to your code, running into stack traces/errors, searching Google for workarounds, and testing your exporter until it does what you need it to do. If you're this far, keep up the great work!
Remember, StackOverflow is your friend and the Dradis Community Forums are here to help.